
Unplanned downtime in Indian process plants—whether in a Gujarat petrochemical refinery, a Maharashtra pharmaceutical facility, or a thermal power plant—carries an immense financial burden. When plant engineers encounter a sudden increase in pressure drop (ΔP), unexplained piping noise, or an apparent loss of flow capacity, the immediate reaction is often to blame the flow meter. Prematurely replacing process instrumentation can result in ₹20,000 to ₹10,00,000 in wasted CapEx and labor, especially when the root cause lies in process conditions, piping installation, or signal interference.
Correctly diagnosing these symptoms requires separating true process restrictions from meter-specific issues. This comprehensive engineering guide helps you troubleshoot Vortex Flow Meters to restore optimal performance without unnecessary equipment replacements.
1. Quick Reference: How Vortex Flow Meters Work
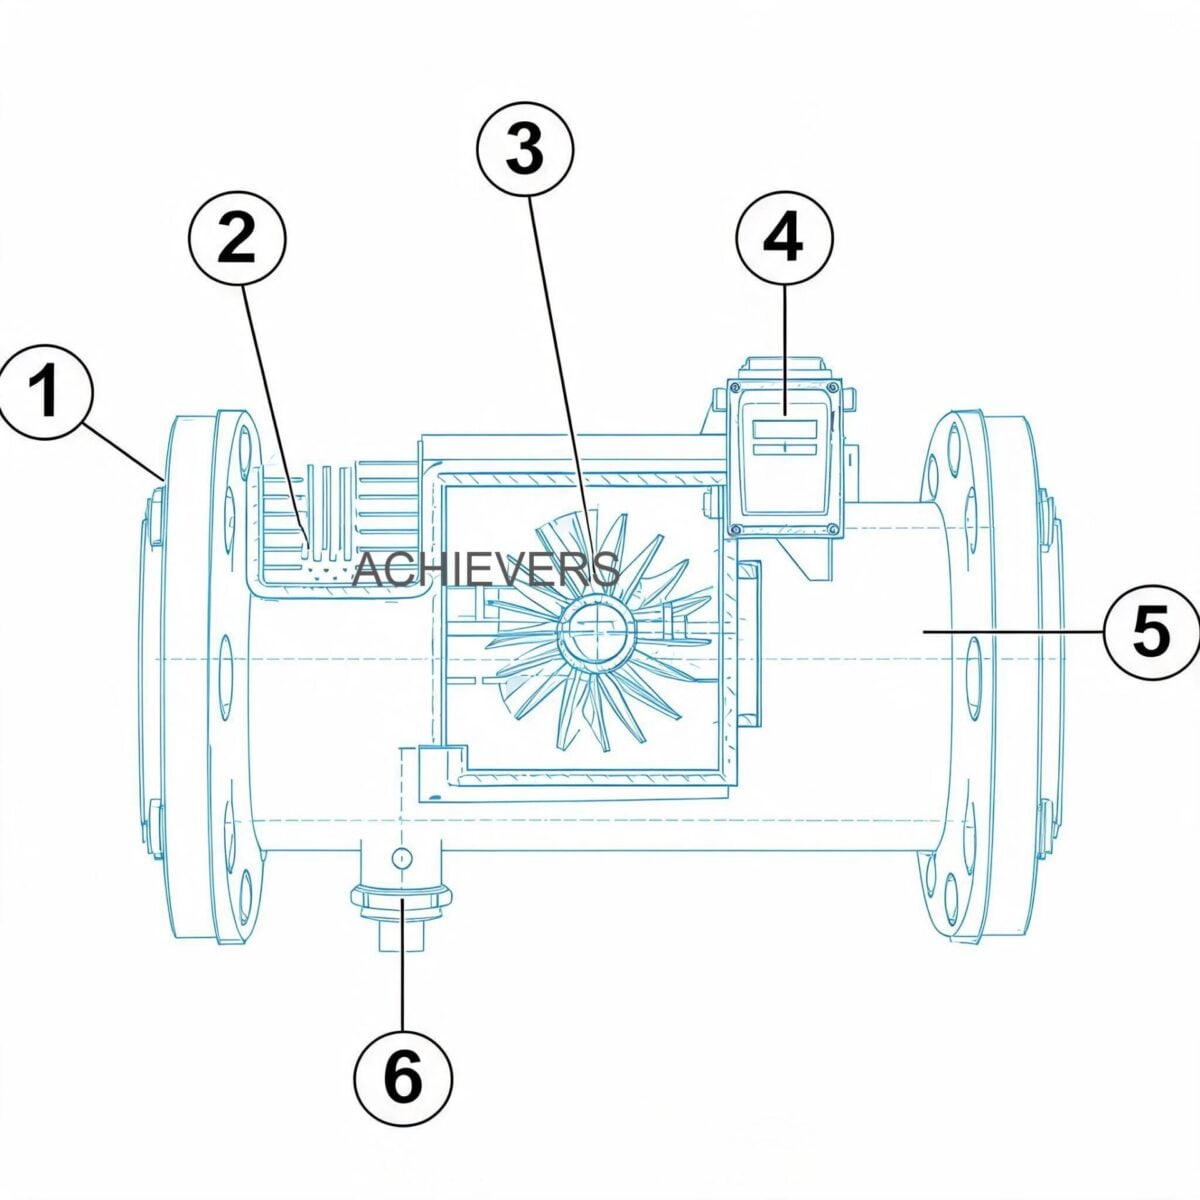
Before diving into fault diagnosis, it is critical to understand the measurement physics. Vortex Flow Meters operate on the Von Kármán effect. A non-streamlined obstacle (the bluff body) is placed in the path of the flowing fluid. As the fluid passes this bluff body, it separates and forms alternating low-pressure areas (vortices) downstream.
A piezoelectric or capacitive sensor detects the mechanical stress or pressure variations caused by these shedding vortices. The frequency of the vortex shedding is directly proportional to the fluid velocity.
Engineering Formula: Von Kármán Frequency
The relationship is defined as:
f = (St * V) / d
Where:
- f = Frequency of vortex shedding (Hz)
- St = Strouhal number (a dimensionless calibration constant, typically around 0.22 for standard bluff bodies over a wide range of Reynolds numbers)
- V = Fluid velocity (m/s)
- d = Width of the bluff body (m)
Because the frequency only depends on velocity and the geometry of the bluff body, the meter is largely immune to changes in fluid density, viscosity, or temperature—provided the fluid remains in a turbulent flow regime (Reynolds number > 10,000).
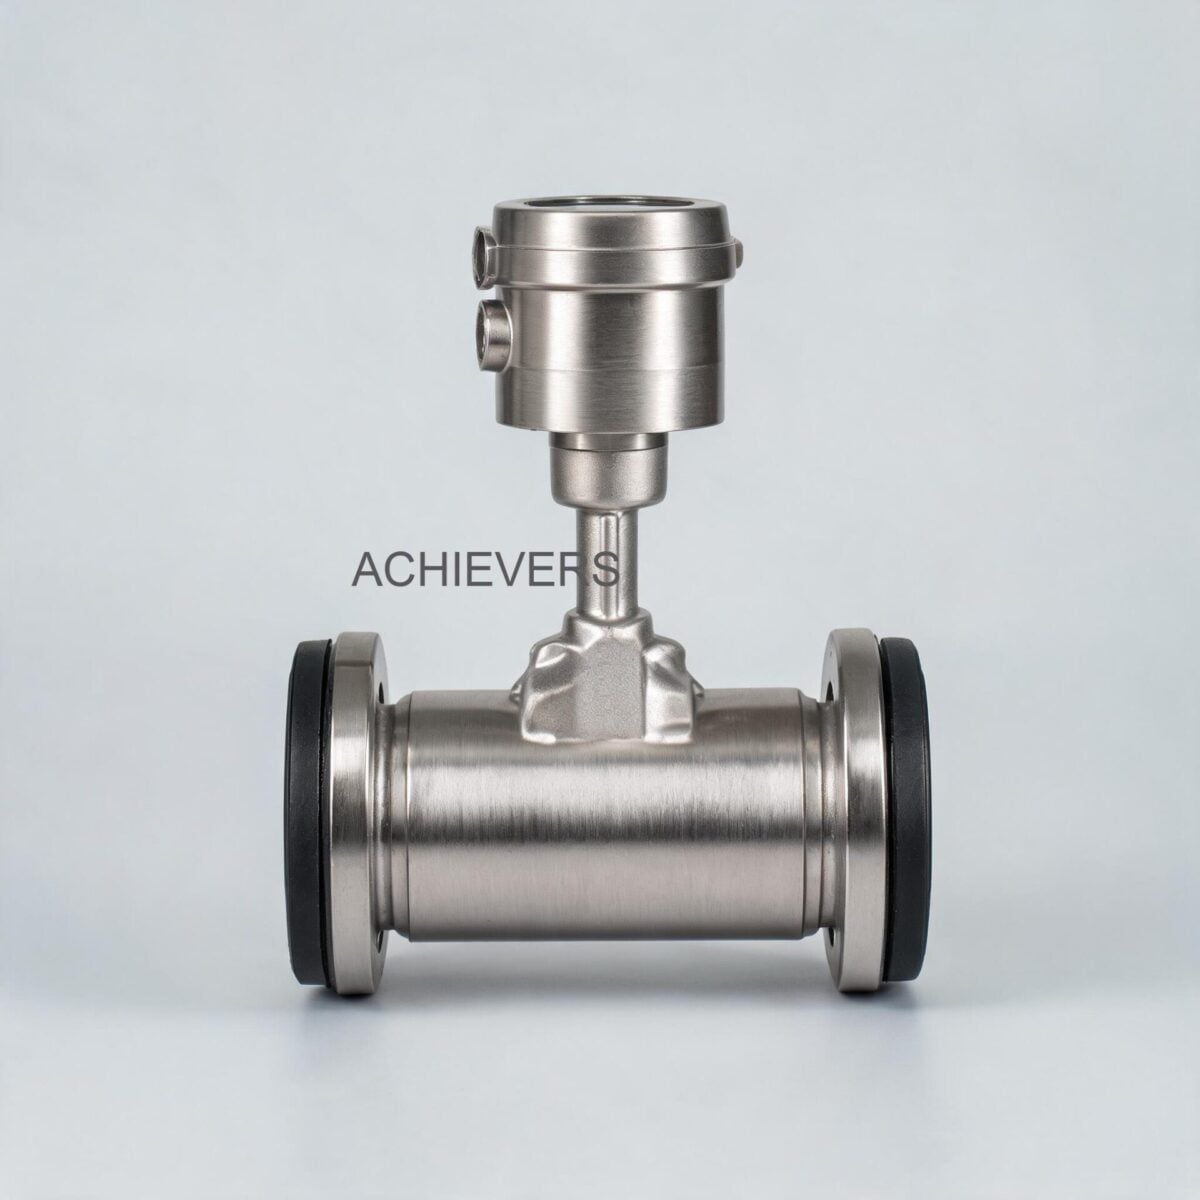
Technical Specifications (Lumen Instruments "Achivers" Series)
To accurately troubleshoot, you must verify that your process conditions do not exceed the manufacturer's nameplate limits. Below are the definitive specifications for our vortex instruments:
| Parameter | Specification Rating |
| — | — |
| Line Size | DN 15 to DN 300mm |
| Temperature Range | -50°C to 350°C |
| Maximum Pressure | 20 kg/cm² |
| Signal Output | 4-20 mA, Pulses, RS 485 Modbus |
| Power Supply | 24Vdc two-wire |
| Compensation | Inbuilt pressure & temperature compensation |
| Mounting Types | Flange type, Sandwich (Wafer) type, Clamp On / Insertion |
Technology Comparison Table
No single flow measurement technology fits every Indian industrial application. Here is how vortex technology compares to Electromagnetic Flow Meters and Turbine Flow Meters to help you verify if you selected the right tool for the job.
| Parameter | Vortex Flow Meter | Electromagnetic Flow Meter | Turbine Flow Meter |
| — | — | — | — |
| Best For | Steam, gases, clean low-viscosity liquids | Conductive liquids, slurries, wastewater | Clean hydrocarbons, batching operations |
| Moving Parts | None (Solid-state sensor) | None | Yes (Rotor and bearings) |
| Pressure Drop | Moderate (due to bluff body) | Zero (unobstructed pipe) | High (due to rotor assembly) |
| Max Temperature | Up to 350°C | Typically up to 150°C (PTFE liner) | Typically up to 150°C – 250°C |
| Media Conductivity | Independent | Requires > 5 µS/cm | Independent |
| Reynolds Requirement | Re > 10,000 (Turbulent) | Profile dependent, forgiving | Profile dependent |
Decision Matrix: When to Use This Technology
- Use Vortex when: Measuring saturated or superheated steam in boiler networks, monitoring compressed air lines, or measuring high-temperature thermic fluids up to 350°C.
- Do NOT use Vortex when: The fluid is highly viscous (heavy furnace oil), heavily particulate-laden (slurries that will abrade the bluff body), or moving at very low velocities where turbulent flow cannot be sustained.
2. Troubleshooting Matrix
When encountering high pressure drops, unexpected piping noise, or a sudden loss in flow readings, consult this matrix before disassembling the Vortex Flow Meters.
| Symptom | Likely Cause | Diagnosis Steps | Fix |
| — | — | — | — |
| Sudden High Pressure Drop (ΔP) | Strainer fouling upstream | Measure ΔP across the upstream strainer using pressure gauges. | Isolate line, blow down, and clean the Y-strainer mesh. |
| Piping Noise / Hammering | Wet steam / Condensate pooling | Check for missing insulation or failed steam traps upstream of the meter. | Repair steam traps; ensure piping is sloped correctly away from the meter. |
| Noise + Erratic High Reading | Pipe vibration | Check local piping with a vibration pen. Ensure frequency is outside meter's cut-off. | Add pipe supports/anchors within 1 meter of the sensor. Adjust Low Flow Cut-off (LFC). |
| Zero Reading but Fluid is Flowing | Low velocity (Laminar flow) | Calculate actual Reynolds number based on flow rate and viscosity. | If Re < 10,000, reduce pipe size at meter run to increase velocity. |
| Drifting / Unstable Output | Voltage fluctuations / Ground loops | Measure 24Vdc supply loop stability. Check for 50Hz AC ripple on the DC line. | Install a clean regulated power supply. Ensure single-point grounding per BIS standards. |
| Display Error / Fault Code | Moisture in transmitter | Inspect transmitter housing for condensation common during Indian monsoons. | Dry the enclosure. Replace silica gel packets. Ensure cable glands are IP67 sealed. |
| Lower Flow Capacity than Expected | Incorrect K-Factor programmed | Verify the K-factor on the display against the meter's original calibration certificate. | Reprogram the K-factor (Pulses/Unit Volume) in the transmitter menu. |
| Sudden Capacity Loss (Liquid) | Cavitation or Flashing | Check if downstream pressure drops below the fluid's vapor pressure. | Increase downstream backpressure (e.g., install a restriction orifice or valve downstream). |
| Leakage at Flanges | Thermal cycling / Gasket failure | Inspect flange mating surfaces and gasket condition, especially after a cold start. | Replace gaskets. Torque flange bolts in a star pattern to rated specification. |
| Output Signal Loss (4-20mA) | Blown loop fuse / Wiring break | Check loop continuity and resistance. Ensure total loop load < 600 ohms. | Replace fuse; repair wire terminations. Check for rodent damage common in cable trays. |
3. Step-by-Step Field Diagnosis Procedure
When a vortex meter in your facility exhibits high pressure drop or throughput loss, follow this 8-step field diagnostic procedure.
Tools Required: Digital Multimeter (DMM) with frequency and 4-20mA loop measurement, portable oscilloscope (optional but recommended), ultrasonic thickness gauge, vibration pen, and the original factory calibration sheet.
Step 1: Verify the Local Display vs. Control Room
Determine if the issue is mechanical or electronic. If the local display shows 50 m³/hr but the PLC/DCS reads 0 m³/hr, the problem is in the 4-20mA loop, RS-485 Modbus wiring, or PLC scaling—not the meter hardware.
Step 2: Inspect for Upstream Restrictions
A sudden increase in line pressure drop is rarely caused by the vortex meter itself, as the bluff body geometry does not change. Check the Y-strainers and isolation valves immediately upstream. In Indian water and steam lines, scale buildup (hard water) and weld slag are common culprits.
Step 3: Check for Pipeline Vibration
Vortex sensors detect microscopic deflections. If nearby heavy machinery (like a reciprocating compressor or positive displacement pump) is vibrating the pipe, the sensor will interpret this mechanical noise as flow, resulting in erratic or falsely high readings. Use a vibration pen. If vibration is present, adjust the Low Flow Cut-off (LFC) parameter in the transmitter or brace the pipe.
Step 4: Analyze for Cavitation and Flashing (Liquid Applications)
If the fluid is liquid and you hear a sound like gravel moving through the pipe, you are experiencing cavitation. This happens when the pressure at the bluff body drops below the liquid's vapor pressure, forming bubbles that collapse violently. Ensure that your downstream backpressure (P_back) satisfies this engineering rule of thumb:
P_back > (2.9 * ΔP) + (1.3 * P_vapor)
If it does not, throttle a valve downstream of the meter to increase backpressure.
Step 5: Diagnose Wet Steam Conditions (Steam Applications)
If throughput drops and noise increases in a steam application, you likely have wet steam. Condensate pooling at the bottom of the pipe hitting the bluff body causes severe noise and measurement errors. Check the thermodynamic steam traps upstream of the meter to ensure they are functioning.
Step 6: Verify the K-Factor Configuration
Go into the transmitter menu. Check the programmed K-Factor. If a technician accidentally altered the K-factor during routine maintenance, the meter will calculate flow capacity incorrectly. The programmed K-factor must perfectly match the tag plate or calibration certificate.
Step 7: Check Signal Integrity and Power Quality
Indian industrial grids often suffer from voltage spikes and harmonics. Use your DMM to measure the 24Vdc two-wire loop. It should read a stable voltage between 18V and 36V. If measuring the 4-20mA output, ensure the loop resistance is within the transmitter's drive capability.
Step 8: Sensor Diagnostics (Oscilloscope Check)
If flow is occurring but the meter reads zero, connect an oscilloscope to the raw sensor output terminals (if accessible per the manual). You should see a clean sine wave. A flatline indicates a shattered piezoelectric crystal or flooded sensor assembly.
4. Installation and Setup Errors That Cause Ongoing Problems
Many troubleshooting calls stem not from equipment failure, but from poor initial installation. An incorrectly installed vortex meter will never yield accurate results and will constantly trigger process alarms.
| Installation Error | Symptom | Correction |
| — | — | — |
| Inadequate Straight Pipe Runs | Erratic readings, low accuracy | Ensure minimum 10D (diameters) upstream and 5D downstream of straight, unobstructed pipe. |
| Protruding Flange Gaskets | High pressure drop, inaccurate flow | Ensure gaskets are perfectly centered. A protruding gasket acts as a secondary bluff body, ruining the flow profile. |
| Meter Installed at Pipe High-Point (Liquids) | Zero flow reading, erratic spiking | Entrapped air bubbles gather at high points. Relocate meter to a lower section or vertical line with upward flow. |
| Meter Installed at Pipe Low-Point (Gases/Steam) | Mechanical damage, erratic flow | Condensate pools at low points. Install meter in vertical lines or higher horizontal runs. |
| Control Valve Placed Upstream | Severe signal noise and drift | Control valves generate extreme turbulence. Always place control valves downstream (at least 5D away) of the flow meter. |
| Incorrect Internal Diameter (Schedule) | Consistent over/under reading | The K-factor is calibrated for a specific pipe ID. If installed in a Schedule 80 pipe when calibrated for Schedule 40, recalculate the scaling. |
5. Preventive Maintenance to Avoid Recurrence
While solid-state flow meters require far less maintenance than mechanical meters, the harsh conditions of Indian industrial environments dictate a rigorous preventive maintenance schedule to maximize the lifespan of your ₹20,000+ investment.
Quarterly Electrical Checks:
Monsoon humidity often breaches poorly sealed enclosures. Inspect the transmitter housing for moisture. Ensure cable glands are tight and apply dielectric grease to terminals. If using the RS-485 Modbus output, verify termination resistors are intact to prevent signal reflection.
Bi-Annual Process Checks:
For steam and dirty liquid applications, schedule a shutdown to remove the meter and inspect the bluff body. Look for scaling (calcium/magnesium deposits common in Indian borewell water), pitting, or erosion. A deformed bluff body changes the Strouhal number, permanently altering the meter's calibration. Clean the bluff body carefully using mild solvents and non-abrasive tools.
Vibration Isolation Verification:
Over time, pipe supports can loosen due to thermal expansion and contraction. Re-torque pipe anchors and vibration dampeners on either side of the meter run every six months to prevent mechanical noise interference.

6. When to Call Service vs. Fix Yourself
Knowing your limits prevents voiding warranties and causing permanent damage.
Field-Fixable Issues:
- Reprogramming K-factors, output scaling (4-20mA ranges), and Modbus addresses.
- Adjusting the Low Flow Cut-off (LFC) to eliminate vibration noise.
- Replacing external loop wiring, fuses, and power supplies.
- Cleaning the pipeline strainers and replacing flange gaskets.
Requires Factory Service / Replacement (Contact Lumen Instruments):
- Sensor Replacement: If the piezoelectric sensor is mechanically shattered by water hammer or shorted due to process fluid ingress, it must be replaced and the unit recalibrated.
- Bluff Body Erosion: If the bluff body is heavily worn down by particulate matter, the meter's fundamental geometry is altered. It cannot be fixed via software scaling; the unit must be rebuilt or replaced.
- Transmitter PCB Failure: If a high-voltage spike has fried the main processing board, it requires a factory replacement PCB mapped to the specific sensor.
- PESO / Legal Metrology Seals Broken: If working in a highly regulated hazardous area (Zone 1/Zone 2) or custody transfer application, opening hermetically sealed components may violate PESO (Petroleum and Explosives Safety Organisation) certification.
FAQ
Q: Can a vortex flow meter cause a complete loss of flow capacity in my pipeline?
A: No. Because the bluff body only obstructs a small percentage of the cross-sectional area, a vortex meter cannot completely block flow unless a massive foreign object is pinned against it. If you have zero flow capacity, look for closed block valves, heavily clogged strainers, or a failed pump upstream.
Q: My 4-20mA output fluctuates wildly, but the local LCD display shows a steady flow. What is wrong?
A: This points directly to an electrical issue, not a mechanical or process one. Check for loose terminal connections, moisture inside the electrical housing, or ground loops. Ensure the instrument casing is tied to a clean instrumentation earth.
Q: How do I know if my problem is cavitation or just normal pipe noise?
A: Cavitation sounds distinctly like rocks or marbles flowing rapidly through the pipe. It also usually coincides with a sudden, erratic drop in the flow reading as bubbles form around the sensor. Calculating your downstream pressure against the fluid's vapor pressure is the definitive engineering check.
Q: What is the maximum temperature the Lumen Instruments vortex meters can handle?
A: Our standard specifications accommodate temperatures from -50°C to 350°C. This makes them ideal for thermic fluids, superheated steam, and cryogenic applications. Exposing the meter to temperatures above 350°C can permanently depolarize the piezoelectric sensor crystal.
Q: The flow meter under-reads consistently by about 10%. Why?
A: Consistent percentage errors are almost always setup issues. The most common causes are an incorrect internal pipe diameter (e.g., using heavy-wall pipe when the meter was calibrated for thin-wall), an incorrectly entered K-factor, or failing to meet the upstream 10D straight-run requirement, leading to a skewed velocity profile.
Q: Do I need to recalibrate my vortex meter if the fluid density changes?
A: No. Vortex meters are volumetric devices that measure fluid velocity based on shedding frequency, which is largely independent of fluid density, viscosity, and pressure (as long as the Reynolds number remains above 10,000). However, if you are calculating mass flow, your external flow computer must be updated with the new density values.
Q: Why does the meter read a small flow rate when the valves are closed and the pump is off?
A: This is caused by pipeline vibration being detected by the sensor crystal. To fix this without altering the piping, enter the transmitter setup menu and raise the Low Flow Cut-off (LFC) value until the false reading drops to zero.
Are you experiencing persistent measurement issues, or are you looking to upgrade your plant's instrumentation with equipment designed for harsh Indian site conditions? Contact Lumen Instruments today. Please provide your required product name, expected flow capacity, fluid type, operating temperature, and site conditions, and our engineering team will help you select and size the perfect solution.